
If you’ve ever lifted a warm loaf of homemade gluten-free bread from your oven, you know there’s a moment of pure pride: the scent, the golden crust, the soft interior that feels alive rather than dense. But reaching that moment doesn’t happen by accident. Gluten-free bread requires intention, precision, and a little heart. It’s a craft that blends science with sensation—feeling the dough, listening to it, watching it transform.
Today, I’m showing you exactly how to make gluten-free bread that doesn’t just “pass” as bread but rises to its fullest potential. We’re going from rustic artisan loaves with crackly crusts, to pillowy brioche dreams rich with butter and warmth, to soft sandwich bread that slices like a dream.
Think of this as a chef’s masterclass—technique-heavy, sensory, and full of the little details that turn gluten-free bread baking into something beautiful. Throughout the guide, you’ll find our article to pair with your baking journey, like:
• 15 Best Gluten-Free Bread Recipes
And because great bread deserves great spreads, you can pair these loaves with caramel sauce, chocolate desserts, or almond-flour treats from across your site.
Let’s begin. Your kitchen is about to smell incredible.
1. Understanding Gluten-Free Bread: What Makes It Different?
Gluten is the structure-builder in traditional bread. It traps gas, gives elasticity, and creates chew. When you remove gluten, you must rebuild structure using:
Starches
Proteins
Hydration
Binders
Strategic mixing
That’s why gluten-free bread dough looks more like a thick batter than a kneadable dough. It shouldn’t be stiff, or form a ball. It should feel like something between cake batter and cookie dough—soft, hydrated, alive.
What gluten-free dough needs:
Higher hydration (more water = more lift)
Protein-rich flours (sorghum, brown rice)
Light starches (tapioca, potato)
Binders (psyllium or xanthan)
A warm rise
Longer bake time
The magic happens when structure and hydration balance. Too little water, and the loaf is heavy. Too much, and it collapses. This guide shows you how to avoid every common mistake.
2. The Ingredients That Build Great Gluten-Free Bread
Before we start baking, let’s refine your pantry.
2.1 Gluten-Free Flours
Use a blend for structure + softness. Your foundation flours include:
– Brown rice flour
– Sorghum flour
– Oat flour (certified gluten-free)
– Millet flour
– Almond flour (richness)
2.2 Starches
Starches lighten the crumb and help browning:
• Tapioca starch (stretch, chew)
• Potato starch (tenderness)
2.3 Binders
These replace gluten’s elasticity:
• Psyllium husk powder
• Xanthan gum (use lightly)
Psyllium creates a bread-like, flexible dough and makes shaping easier.
2.4 Yeast
Use instant or active dry. Both work, but active dry rises slower and develops deeper flavor.
2.5 Fats
Fats enrich flavor, moisture, and tenderness:
– Olive oil (rustic loaves)
– Butter (brioche)
– Coconut oil (sweet breads)
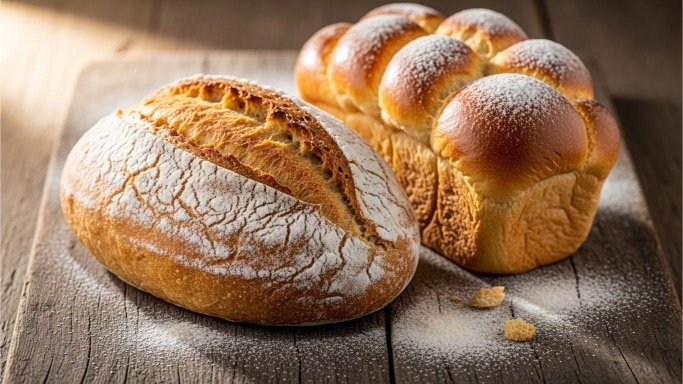
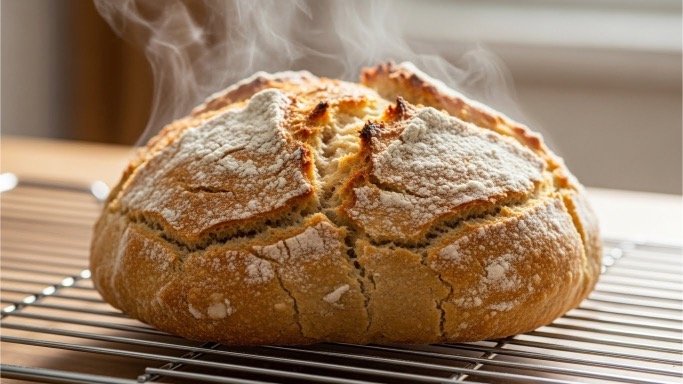
3. How to Make Gluten-Free Rustic Artisan Bread
This loaf has a crisp crust, open crumb, and rustic aroma. It pairs well with soups, cheeses, or homemade spreads.
Ingredients
– 2 cups (280 g) brown rice flour
– A cup (140 g) sorghum flour
. 1 cup (160 g) tapioca starch
– 1/4 cup (25 g) potato starch
– 1 tbsp psyllium husk powder
. 2 tsp sea salt
– 1 tbsp sugar
. 2 ½ tsp instant yeast
. 2 cups warm water (450–500 ml)
– 3 tbsp olive oil
Instructions
- Mix dry ingredients.
Whisk flours, starches, psyllium, sugar, salt, and yeast in a bowl. - Add wet ingredients.
Whisk warm water and olive oil. Pour into dry mix. Stir until batter thickens and becomes smooth. It should resemble thick cake batter. - Rest the dough.
Allow it to hydrate for 10 minutes. Psyllium will transform the texture into something more workable. - Shape into loaf.
Scoop the dough into a parchment-lined loaf pan or shape into a round on a baking sheet. - Rise.
Let rise in a warm place for 45–60 minutes. It should increase by at least 50%. - Bake.
Bake at 425°F (220°C) for 45–50 minutes until golden and hollow-sounding when tapped. - Cool completely.
Cooling sets the crumb and prevents gumminess.
Result
A rustic loaf with deep color and a hearty, satisfying bite.
4. How to Make Gluten-Free Brioche
Brioche is the dreamiest bread—soft, buttery, golden, slightly sweet. Gluten-free brioche takes patience and precision, but the payoff is worth every step.
Ingredients
– 2 cups (280 g) gluten-free all-purpose flour blend
– 1/2 cup (60 g) almond flour
– 1/2 cup (80 g) tapioca starch
– 1 tbsp psyllium husk powder
– 1/4 cup (50 g) sugar
– 1 tsp salt
– 2 ½ tsp instant yeast
– 4 large eggs (room temp)
– 1/2 cup warm milk (or almond milk)
– 1/2 cup softened butter (or vegan butter)
– 1 tsp vanilla extract
Instructions
- Combine dry ingredients.
Flour blend, almond flour, tapioca, psyllium, sugar, salt, yeast. - Add eggs + milk.
Mix eggs, milk, and vanilla. Then add to dry mix. - Add butter slowly.
Add butter one tablespoon at a time. Mix until smooth. Dough will be sticky—this is correct. - Rise.
Cover and let rise for 1 hour. - Second rise.
Pour into a loaf pan or brioche mold. Allow another 30 minutes to rise. - Bake.
Bake at 350°F (175°C) for 35–40 minutes until golden brown. - Cool thoroughly.
This ensures the crumb sets without collapsing.
Result
Soft, buttery, cloud-like brioche with a tender crumb perfect for French toast, sandwiches, or simple slices with butter.
5. How to Make Gluten-Free Sandwich Bread
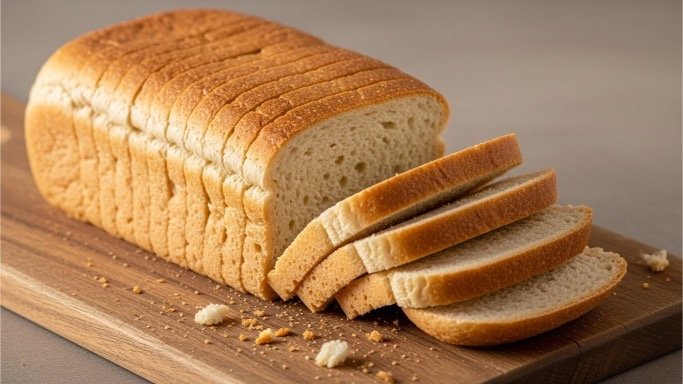
This loaf slices beautifully and stays soft for days.
Ingredients
– 2 cups (280 g) gluten-free all-purpose flour blend
– 1/2 cup oat flour
– 1/2 cup tapioca starch
– 1 tsp xanthan gum or 1 tbsp psyllium
– 1 tbsp sugar
– 2 tsp salt
– 2 ½ tsp instant yeast
– 2 cups warm water
– 2 tbsp oil
Instructions
- Mix dry ingredients.
- Add water + oil.
- Beat batter for 3 minutes to incorporate air.
- Pour into loaf pan.
- Rise 40 minutes.
- Bake 45 minutes at 375°F.
- Cool at least 2 hours.
Result
Soft, flexible slices that rival wheat bread.
6. Techniques That Elevate Your Gluten-Free Bread
6.1 Hydration Is Everything
Gluten-free flours need more water. Hydration creates lift.
6.2 Warm Rise
Yeast thrives at 75–85°F (24–29°C).
6.3 Long Bake Time
The interior needs extra time to set. Underbaking causes gumminess.
6.4 Cooling
Cooling is crucial. Steam escapes, crumb sets, flavor deepens.
6.5 Use Psyllium for Structure
It mimics gluten’s stretch, especially in brioche and artisan loaves.
7. Troubleshooting Common Problems
| Problem | Cause | Solution |
| Dense loaf | Low hydration | Increase water by 10% |
| Gummy texture | Underbaked | Add 10 minutes baking time |
| Bread sinks | Too much moisture | Increase flour or psyllium slightly |
| Dry loaf | Too much flour | Add oil or water next batch |
8. Pairing Gluten-Free Bread With Your Best Recipes
Your site already has incredible recipes that pair beautifully:
Bread is just the beginning—pair it with spreads, desserts, and sauces to elevate your table.
The bottom line — Bread That Makes You Proud
Making gluten-free bread from scratch is more than following a recipe. It’s a mixture of chemistry, patience, and small victories. When your loaf rises higher than the last one, when your brioche turns golden and tender, when your rustic bread cracks just right—you’ll feel it. You’ll know you’ve created something meaningful.
From rustic loaves to buttery brioche, gluten-free bread can be every bit as satisfying, complex, and beautiful as traditional baking. You just need the right flour blend, hydration, and technique—and now you have all three.
So preheat your oven, trust the dough, and bake boldly. Gluten-free bread doesn’t have to imitate wheat bread. It can outshine it.