

Gluten free cakes
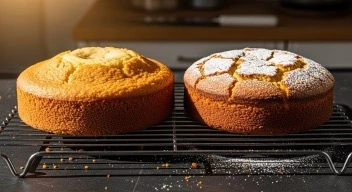
Close your eyes and imagine this scene: a sun-lit kitchen, the scent of butter and citrus in the air, and two cooling racks in front of you — one holding a golden vanilla-almond sponge, the other a lemon-olive-oil cake glowing under afternoon light.
One is classic. The other, modern. Both are perfect.
The difference isn’t luck or expensive ingredients. It’s understanding how gluten-free cakes behave — and how to bake them the way a chef does: with equal parts science, texture awareness, and sensual intuition.
Gluten-free cakes used to have a reputation for being heavy, dry, or oddly elastic. But that was before bakers began treating gluten-free baking as its own discipline rather than a substitution. By learning how to balance flours, control hydration, and layer flavor intentionally, you can bake cakes that are light yet moist, crumbly yet cohesive, rich yet airy.
Today we’ll unlock the secrets to both classic butter-based cakes and modern moist gluten-free cakes — so your next slice feels like dessert perfection, not dietary compromise.
1. Why Gluten-Free Cakes Fail (and How Chefs Prevent It)
Most disappointments in gluten-free cakes come down to structure. Gluten provides elasticity and traps gas for lift. Remove it, and the balance between fat, liquid, and starch becomes fragile.
Common issues include:
- Dense crumb — from low aeration or under-hydration
- Gummy center — from too much starch or poor baking temperature
- Dryness — from insufficient binders or overbaking
- Crumbly slices — from lack of structure-builders like psyllium or xanthan
The chef’s fix is understanding that structure comes from a system, not a single ingredient. Proteins, starches, fats, and moisture interact like choreography. Each ingredient has a role — and every one matters.
2. The Anatomy of a Perfect Gluten-Free Cakes
2.1 The Flour Blend
Forget single flours. Great gluten-free cakes depend on blends that balance strength, softness, and flavor.
A professional ratio looks like this:
- 40 % brown rice flour (neutral structure)
- 25 % tapioca starch (chew and tenderness)
- 20 % potato starch (moisture retention)
- 10 % almond or oat flour (flavor + richness)
- 5 % psyllium husk powder (binding and elasticity)
This creates a stable crumb that can hold air, butter, and sugar like a wheat-based batter.
If you haven’t yet, bookmark: Gluten-Free Flours – A Complete Guide You Need To Know
for a detailed comparison of these ingredients.
2.2 The Binders
Gluten once acted as your elastic net. Replace it intelligently:
- Psyllium husk powder — provides chew and moisture
- Xanthan or guar gum — adds viscosity
- Eggs — deliver structure and color
- Chia or flax gel — works well in vegan cakes
For every 2 cups of flour blend, use:
- 1 tsp psyllium or xanthan gum
- 3 large eggs or plant equivalent
- Enough liquid to create a thick yet pourable batter
2.3 Fats and Liquids
Butter equals flavor and tenderness, but oil brings moisture that lasts for days. Chefs often combine both.
Use:
- 60 % butter + 40 % oil (grapeseed, olive, or avocado)
- Add yogurt, sour cream, or coconut milk for additional fat-based softness
The golden rule: fat replaces gluten’s tenderness gap. Don’t fear richness; balance it.
Reference: Serious Eats on the science of cake structure
2.4 Sugar and Sweet Balance
Sugar isn’t just sweet — it locks in moisture and assists aeration. In gluten-free cakes, it also improves shelf life.
Reduce sugar only cautiously; it’s structural.
If you prefer natural sweeteners, use honey or maple syrup but reduce other liquids slightly.
2.5 Leavening
Baking powder and baking soda do more than lift — they control texture.
- Use 1 tsp baking powder per cup of flour blend
- If adding acidic ingredients (like yogurt or lemon), include ¼ tsp baking soda
This ensures your cake rises evenly without collapsing.
3. Two Cakes, Two Stories — Classic vs. Modern
Side by side, the vanilla-almond sponge and the lemon-olive-oil cake represent the two great schools of gluten-free perfection.
3.1 The Classic: Vanilla-Almond Butter Cake
Texture: Tender crumb, rich aroma, golden crust.
Mood: Celebration, comfort, afternoon tea.
Key technique: Creaming butter and sugar builds air pockets — critical since gluten-free batters can be heavier.
Chef’s Steps:
- Beat 200 g butter with 180 g sugar until light and fluffy.
- Add 3 eggs, one at a time.
- Combine 2 cups flour blend with 2 tsp baking powder + pinch of salt.
- Alternate dry mix and 120 ml milk; fold gently.
- Add ½ tsp almond extract + 1 tsp vanilla.
- Bake at 350 °F / 175 °C for 35–40 min.
Result: A cake with crisp edges and a moist, springy crumb that slices cleanly. Perfect for layered frostings or fruit toppings.
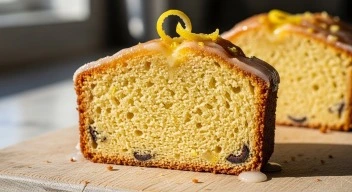
3.2 The Modern: Lemon-Olive-Oil Cake
Texture: Silky, fragrant, naturally moist.
Mood: Mediterranean simplicity with a gourmet edge.
Key technique: Whisking eggs and sugar instead of creaming butter lightens the texture; olive oil keeps it luscious for days.
Chef’s Steps:
- Whisk 3 eggs with 200 g sugar until pale and thick.
- Add 120 ml extra-virgin olive oil + zest of 2 lemons.
- Fold in 2 cups gluten-free flour blend + 1 tsp baking powder.
- Add 120 ml almond milk or yogurt; mix until smooth.
- Bake at 325 °F / 160 °C for 40 minutes.
Result: Golden outside, tender inside, with a perfume that lingers. A drizzle of lemon syrup heightens both shine and flavor.
Gluten free cakes
Gluten free cakes
4. Hydration, Heat, and Patience — The Chef’s Holy Trinity
Hydration
Gluten-free flours absorb water differently. A batter that looks perfect now may thicken as it rests. Always allow a 10-minute hydration pause before baking.
If the batter stiffens too much, whisk in 2 tbsp warm water or milk.
Heat
Even baking depends on steady, moderate heat.
Too hot = peaked center, raw core.
Too low = pale crust, gummy interior.
For loaf and bundt cakes: 325–340 °F (160–170 °C).
For layers or sponges: 350 °F (175 °C).
Use light-colored pans; dark tins over-brown gluten-free cakes quickly.
Patience
Cakes continue setting as they cool. Slice too early and moisture escapes. Let cool 20 minutes in pan, then transfer to rack for at least 45 minutes more.
5. Modern Techniques for Unforgettable Texture
- Reverse Creaming — Mix butter with flour blend first; this coats starch granules, reducing gumminess.
- Whipped Egg Whites — Fold stiff whites into batter for lift.
- Brown Butter Flavor Base — For butter cakes, gently brown half your butter; adds nutty aroma.
- Infusions — Steep herbs (thyme, lavender, basil) in your milk or cream for dimension.
- Moisture Anchors — Add fruit purées, shredded zucchini, or yogurt to trap steam and extend freshness.
Each technique turns a good cake into a memorable one — where even crumbs tell a story.
6. Troubleshooting: When Things Go Wrong
| Problem | Cause | Chef’s Fix |
| Cake sinks after baking | Too much liquid or underbaked | Increase bake time 5 min; check internal temp = 205 °F |
| Dense or heavy texture | Overmixed batter | Mix until just combined; add ½ tsp baking powder |
| Gummy center | Excess starch or under-hydration | Reduce starch 10 %; rest batter longer |
| Crumbly slices | Insufficient binder | Add ½ tsp psyllium or xanthan gum |
| Dry edges | Overbaking | Lower oven 10 °F; use parchment wrap for last 10 min |
Gluten free cakes
Gluten free cakes
7. Chef’s Quick Reference Chart: Flours, Ratios & Texture Outcomes
| Flour | Texture Contribution | Ideal Cake Type |
| Brown Rice Flour | Light, neutral | Sponge, chiffon |
| Almond Flour | Moist, rich | Butter cakes |
| Sorghum Flour | Wheat-like flavor | Pound, loaf cakes |
| Tapioca Starch | Chew, gloss | Layer cakes |
| Potato Starch | Soft crumb | Cupcakes |
| Oat Flour | Warm sweetness | Breakfast cakes |
Pro Tip: Combine 3–4 flours for best results. Keep total starches around 40 – 45 % for balance.
This chart will soon be available as a downloadable guide — a perfect companion for your gluten-free baking journey.
8. Flavor Layering: The Chef’s Signature Move
Flavor complexity is what turns homemade into haute cuisine.
Try these pairings:
- Vanilla + Almond + Honey — gentle, bakery-classic warmth
- Lemon + Olive Oil + Thyme — Mediterranean brightness
- Chocolate + Coffee + Sea Salt — deep, adult intensity
- Coconut + Lime + Ginger — tropical freshness
Each pairing tells its own story — and gluten-free cakes, when balanced properly, let those notes shine more vividly because the base flours are neutral canvases.
9. Storing and Serving Like a Professional
- Storage: Wrap cooled cakes in parchment + plastic; store at room temperature 2 days or refrigerate up to 5.
- Freezing: Slice, wrap individually, freeze up to 1 month. Thaw at room temperature.
- Serving: Dust with powdered sugar, drizzle citrus glaze, or layer with whipped cream and seasonal fruit.
Gluten-free cakes hold moisture longer than expected when properly balanced — an advantage you’ll soon appreciate.
The Bottom Line — The Art and Heart of Gluten-Free Cake
Perfection in gluten-free baking isn’t about imitation; it’s about transformation. Once you stop asking your batter to behave like wheat and instead let it express its own rhythm, you’ll discover how forgiving and delightful it can be.
The secret isn’t hiding in a bag of special flour. It’s found in patience, precision, and the way you listen to your ingredients — the hum of the mixer, the perfume of browning butter, the delicate spring of a cake that’s just set.
Bake boldly. Taste often. Adjust with intuition.
And remember — gluten-free can still mean buttery, tender, fragrant, and beautiful.
Continue your journey: Chef’s Secrets: The Best Gluten-Free Custards and Puddings